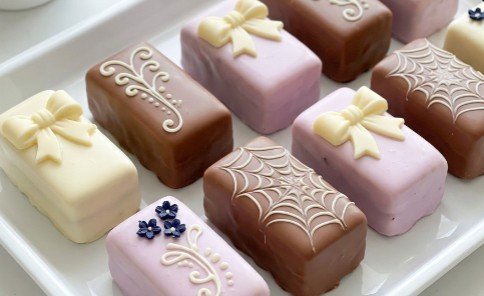
How to Make Elegant Mini Coconut Cakes
Looking for a luxurious treat for your next party? These mini coconut cakes are perfect for you. They look like fancy desserts from a high-end chocolate boutique. Inside, you will find a soft coconut sponge cake layered with sweet, thick coconut cream. The outside is covered in a crisp chocolate shell in beautiful pastel colors. You can decorate them with cute chocolate bows or elegant spiderweb patterns. Let’s make these beautiful bite-sized cakes!
⏱️ Quick Facts
-
Bake Time: 12 Minutes
-
Chill Time: 1 Hour 15 Minutes
-
Method: Baking and Layering
🛒 Ingredients
For the Coconut Sponge:
-
125g Soft Butter
-
125g Sugar
-
A pinch of Salt
-
1 tsp Vanilla Extract
-
2 Large Eggs
-
70g All-purpose Flour
-
30g Shredded Coconut
For the Coconut Cream Filling:
-
1 can Condensed Milk
-
300g Shredded Coconut
For Coating and Decorating:
-
Meltable Chocolates (Milk, White, and Dark)
-
Pink or purple food coloring
-
Modeling chocolate (for making the bows)
👩🍳 Step-by-Step Instructions
1. Bake the Sponge Cake: Mix the soft butter, sugar, salt, and vanilla until smooth. Add the eggs one at a time and mix very well. Gently fold in the flour and the 30g of shredded coconut. Spread this batter flat into a baking pan. Bake at 170°C for exactly 12 minutes. Let the cake cool down at room temperature, then put it in the fridge until it is completely cold.
2. Make the Cream Filling: Mix your can of condensed milk with the 300g of shredded coconut. This makes a very thick and sweet cream. Spread this cream evenly over your cold sponge cake all the way to the edges. Put a piece of baking paper on top and press it down to make the cream perfectly flat. Put the cake back in the fridge for at least 1 hour.
3. Freeze and Cut: Put your chilled cake in the freezer for just 15 minutes right before you want to cut it. This is a great trick to make cutting much easier. Use a sharp knife to cut the cake into small, neat rectangles.
4. Dip in Chocolate: Melt your different colors of chocolate. Dip each cold cake rectangle completely into the melted chocolate. Tap off the extra chocolate so you get a smooth and thin shell.
5. Decorate Like a Pro: You must work quickly while the chocolate shell is still wet. Stick your cute modeling chocolate bows onto the wet cakes. To make the beautiful spiderweb pattern, pipe lines of a different colored chocolate and quickly drag a toothpick through them before they dry.
💡 Tips for Success
Freezing the cake for a short time before cutting is the most important step. It stops the soft sponge from crumbling and keeps your rectangular edges looking sharp and professional. Always make sure your base cake is completely cold before adding the cream filling.
🥡 How to Store
Keep your elegant mini cakes in a closed container in the fridge. Because they are made with a soft cream filling, they need to stay cold. Take them out just a few minutes before eating so the chocolate shell stays perfectly crisp.